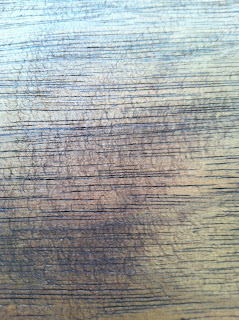
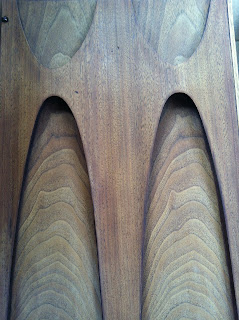
I was so excited to work on this yesterday after work. I did 1 coat of Minwax pre-stain conditioner and then two (and a half) coats of Cabot Dark Walnut stain. I say half a coat of stain only because the second coat began drying faster than I could wipe it off and some parts were sticky so I added more stain and quickly wiped off. I am sure this is a rookie mistake just like my swirly marks from the orbital sander.
The top of the dresser is so long I really should have had help. Plus, it was only about 101 degrees outside when I was doing this in the garage so I had the fan blowing on me so I didn't pass out. There was just no way I could have survived with turning the fan off.
I was super dooper happy to see that there were no swirly marks and the beautiful wood showed through. I am sure I am on a ultra thin piece of veneer after sanding but it turned out ok. I am pretty sure that the grain of the wood wasn't as absorbant as it would have been without the heavy sanding but I think in the end it turned out nicely.
I hope to put on at least 1 coat of wipe on Polyurethane. I have found that this method looks truest to the original and doesn't turn out over glossy like the Broyhill Brasilia Commode I refinished first. Even though it same Minwax Poly I brushed it on and it was not thinned out. When I use the wipe on method I have far far less bubbles and it dries much faster so I can do more coats.
After the poly the only thing I have to do is drill bigger holes for the drawer pulls and then it will be ready to go!!!! YAY!
Tuesday, July 30, 2013
Monday, July 29, 2013
Broyhill Brasilia Dresser - Sanding and Sanding and Sanding
I think I finally got it sanded down enough that the swirlies won't show when I pre-condition and stain. It took about 3 hours of non-stop hand sanding with 220 grit sand paper. I felt fabulous when I finished. I thought I would be worn out and tired but I was surprised that I felt more accomplished than run down. I took my time and tried not to sand straight through the veneer. The second photo shows some splotches which are just wet fingerprints. Ooops. I can't wait to see the stain on it.
I can see the light at the end of the tunnel. Then I will have to find another project to get started on. Maybe I will luck out and find more Broyhill Brasilia pieces. Russel doesn't mind so I will keep looking until I find some. The first piece I'd love to have is a headboard and footboard for a queen bed. One day I hope to own the lingerie dresser and the china cabinet. Let me know if you run into something that doesn't cost an arm and a leg and my precious Bella for trade.
I can see the light at the end of the tunnel. Then I will have to find another project to get started on. Maybe I will luck out and find more Broyhill Brasilia pieces. Russel doesn't mind so I will keep looking until I find some. The first piece I'd love to have is a headboard and footboard for a queen bed. One day I hope to own the lingerie dresser and the china cabinet. Let me know if you run into something that doesn't cost an arm and a leg and my precious Bella for trade.
Tuesday, July 23, 2013
When you mess up your Broyhill Brasilia Dresser.....
 I've encountered a small setback in my furniture refinishing project. The very beautiful wood on the top of the dresser looks so stunning when it was bare wood. I started pre-staining and then put one coat of stain on the top and then I was almost in tears as I watched it dry. The orbital sander I used to sand the paint off left squiggly marks all in the wood. I was so careful to change sanding pads often so that this would not happen and I couldn't see the marks until I stained it.
  So, I have some choices. I can try to keep sanding it down until some of the squiggles are removed but I run the risk of sanding completely through the veneer. I could replace the veneer all together but I am imagining the cost of the veneer would be significant and I have never replaced veneer before. I could end up really messing up my dresser and having to send it off for a professional restoration and then I will have to hang my head in shame and admit I got in over my head.
Although you have to look at the wood from the top or at an angle to see it, I know its there and it will bother me.
I think I will try sanding it down a bit more and then staining it and putting the poly coat on and living with the damage I created.
It's truly heartbreaking.
Wednesday, July 10, 2013
Stain Time
I couldn't hardly wait to get home yesterday to start staining the drawers and the doors. The doors took a lot longer than I expected and I somehow forgot that I had sponge brushes to use and started using a clean rag to rub the stain on. Yeah sometimes I get a head of myself and do goofy stuff like that. I think everything turned out lovely though. I was very surprised by how deep the wood grain looks after I stained it. I just wanted to stare at it.
Another boo-boo I made was not checking the pre-stain conditioner and since the drawers were sitting on an angle and sort of leaning the pre-stain conditioner pooled at what would be the top of the drawer. I don't think this effected the stain any but it could have and that would have been disasterous. I just wiped away the excess and let it completely dry.
This photo below is a comparison between the original wood stain center drawer and a newly stained drawer pictured on the top. The lighting is a little off because of the shadows and sunlight but in person the stain matches perfectly. I was surprised because I didn't have to mix stain colors. This is Cabot Dark Walnut stain right out of the can.
 |
| Bare naked wood |
 |
| I did a pre-stain conditioner just to make sure the stain went on without blotches. |
 |
| Pre-stain conditioner phase |
 |
| Half dry and half wet |
 |
| Close up of the door after pre-stain conditioner |
 |
| Two coats of stain on the left and the right is ready to go. |
 |
| two coats of stain on the drawers |
 | ||||
| two coats of stain on the door. |
 | |||||||
| Comparison with original wood |
Tuesday, July 9, 2013
Update on my Broyhill Brasilia Dresser refinishing
The hardest part so far has definitely been this bottom rail. It feels like there isn't any veneer on this and it's just 100% walnut wood. The paint and stain took a really long time to sand off. You can see the damage to the veneer in between the drawers. I am still not sure what I am going to do. Either replace the 4 panels or just remove the damaged panels. You won't be able to tell unless the drawers are removed anyway. I am pretty sure the damage was caused by moving multiple times and by critters of some sort.
Here is the last two photos I took after completing the first sanding with 80 grit sand paper. I was super shocked at how beautiful the veneer was after all of these years. I was anticipating water marks and deep scratches which had been covered by paint. There were some scratches but they were easily sanded out. There was one tiny spot on the right hand side you can see in the photo below that is deeply "stained" by something. I don't mind though. It will give it a little character.
If you notice, I left the middle part of the dresser unsanded. The dresser had been painted at one time with a dark brown paint, however the middle drawers behind the doors were left unpainted. I considered sanding them down so that they would completely match the new stain, but I decided to keep that part the way it was from the factory. This is furniture I am never planning on getting rid of or selling so it was a personal choice.
Since I took these photos I have completed the second sanding with 220 grit sand paper. The second sanding usually takes a fraction of the time compared to the first sanding. Next I will use pre-stain conditioner and then two coats of stain on the drawers and doors. I am a little concerned with putting the polyurethane coats on the top and sides. The top is very very long and using a brush will leave brush strokes and bubbles so I may use the rub-on method which worked well on the top of the end table.
I wish there was someone I could learn this from. It would be great if there was a class on refinishing furniture. Everything I have learned has been from Russel or the "inner-nets" which is great but hands-on learning works better.
More pics to come. Stay tuned!
Tuesday, July 2, 2013
Beauty from a box
Good news! I finished the end table and I am happy with the way it turned out. I can't wait to see the dresser all finished.
Yesterday I had a pretty emotionally stressful day because I had to help my dad take his dog to be put to sleep. Then we had to dig a hole to bury her in. I am sore from using a pick axe to break up the soil. I was ready to just curl up in bed and sleep so when Russel brought a cute little box in from the mailbox I was happy to see my beautiful drawer pulls inside. They were shiny and beautiful. So, either the guy had them refinished or he actually had them fabricated. Either way I am happy with them. I can't wait to see how they look on the dresser.
I also convinced Russel to help me pick up my cedar chest. Mom's cedar chest. I was very happy to have it back. I cleaned it up and it looks fabulous in the living room.
I am usually looking forward to working on this every day after work. Can't wait until 3:00!!!!
 |
| Before |
 |
| After |
Yesterday I had a pretty emotionally stressful day because I had to help my dad take his dog to be put to sleep. Then we had to dig a hole to bury her in. I am sore from using a pick axe to break up the soil. I was ready to just curl up in bed and sleep so when Russel brought a cute little box in from the mailbox I was happy to see my beautiful drawer pulls inside. They were shiny and beautiful. So, either the guy had them refinished or he actually had them fabricated. Either way I am happy with them. I can't wait to see how they look on the dresser.
I also convinced Russel to help me pick up my cedar chest. Mom's cedar chest. I was very happy to have it back. I cleaned it up and it looks fabulous in the living room.
I am also almost done with the hardest parts of the dresser. I have the very bottom foot pieces and the sides and top. Then on to the second sanding which shouldn't take as long. The edges all had to be hand sanded because they are concave and not flat. The doors turned out nicely and only took about 6 hours all together.
Subscribe to:
Comments (Atom)


