Showing posts with label refinishing. Show all posts

Wednesday, February 5, 2014

The Search Continues....

I am so disappointed that the deal with the Broyhill Brasilia 9 drawer dresser didn't work out. I received a text message from the person at midnight the night before we were going to drive to Houston to pick it up. We had the truck washed and fueled. We had cash ready to go. I was greatly anticipating this trip. His text message said that he had to go out of town for a family emergency for a few days. Gut feeling said it was hokey but I wanted to be nice and give him the benefit of the doubt. So, I waited a few days then sent another text asking if they were available for a Sunday pick up. I received no response. I noticed the ad pop up again briefly and then it got deleted again. I sent another text just a few days ago and I asked if the dresser was still available and explained my intention was not to be a pest, I just didn't want to get my hopes up if it had been sold. I figured this would give them the best opportunity to come clean and say they sold it for more money. I received a response and it just asked which dresser. I said the Broyhill Brasilia and the price we discussed. I received no response. 

I was hoping against my gut feeling that this person was nice and just honestly had a family emergency. Come on people, just be honest. I am sorry, I sold the dresser for more money than you offered. Ok fine. I am good with that. I am not good with being lied to or avoided. Its rude. 

So, people who sell items on Craigslist, ebay, etsy. I understand you want to get the best bang for your buck. I know someone may offer you more down the road. I understand all of that. Just use some common courtesy. Remember back in the old days when a handshake was your word and people never went back on their word? How about a gentleman's agreement? Why are these things not applicable today? Why do we need to be reminded to be good people?

So, my purpose for today's blog entry was to say that I am still searching for a project. I want it to be another Broyhill Brasilia piece. I really don't want to work on anything else. If you see something that needs a little loving I would love to hear about it. The only way I am going to perfect my skills is to keep working on it. 

If you see something on Craigslist for a reasonable amount and its in the vicinity of Austin or Houston I could probably convince Russel to take a trip with me. 

Here are some of the pieces I would love to find....


Tuesday, January 21, 2014

Upcoming Broyhill Brasilia Project

I just made an offer on a Broyhill Brasilia 6 drawer dresser and made a deal to pick it up Sunday. I am so completely excited I can hardly contain myself. I can't wait to start working on it and post pictures. I am not sure what I am going to do with it when I am done.

Here is the rough rough picture from the ad. I just hope everything works out and the deal goes smoothly. 


Thursday, August 15, 2013

Broyhill Brasilia Dresser finished!!!!!....well almost

It's finished!...well as long as I can stand to leave the top like I did. I am still not very good at getting the tops of these furniture pieces smooth like I want them. They turn out streaky or bubbly or like a 2nd grader was given a paint brush. I posted on a woodworking forum to see if I get some suggestion from those more expert than me. Then I will beg Russel to help me move it back into the garage to work on it more. 

I am happy to see the original wood shine through and see it every day in the bedroom. 


Tuesday, July 30, 2013

Broyhill Brasilia Dresser Beautiful wood revealed with stain

I was so excited to work on this yesterday after work. I did 1 coat of Minwax pre-stain conditioner and then two (and a half) coats of Cabot Dark Walnut stain. I say half a coat of stain only because the second coat began drying faster than I could wipe it off and some parts were sticky so I added more stain and quickly wiped off. I am sure this is a rookie mistake just like my swirly marks from the orbital sander. 

The top of the dresser is so long I really should have had help. Plus, it was only about 101 degrees outside when I was doing this in the garage so I had the fan blowing on me so I didn't pass out. There was just no way I could have survived with turning the fan off.

I was super dooper happy to see that there were no swirly marks and the beautiful wood showed through. I am sure I am on a ultra thin piece of veneer after sanding but it turned out ok. I am pretty sure that the grain of the wood wasn't as absorbant as it would have been without the heavy sanding but I think in the end it turned out nicely.

I hope to put on at least 1 coat of wipe on Polyurethane. I have found that this method looks truest to the original and doesn't turn out over glossy like the Broyhill Brasilia Commode I refinished first. Even though it same Minwax Poly I brushed it on and it was not thinned out. When I use the wipe on method I have far far less bubbles and it dries much faster so I can do more coats. 


After the poly the only thing I have to do is drill bigger holes for the drawer pulls and then it will be ready to go!!!! YAY!

Wednesday, July 10, 2013

Stain Time

I couldn't hardly wait to get home yesterday to start staining the drawers and the doors. The doors took a lot longer than I expected and I somehow forgot that I had sponge brushes to use and started using a clean rag to rub the stain on. Yeah sometimes I get a head of myself and do goofy stuff like that. I think everything turned out lovely though. I was very surprised by how deep the wood grain looks after I stained it. I just wanted to stare at it. 

Bare naked wood

I did a pre-stain conditioner just to make sure the stain went on without blotches.

Pre-stain conditioner phase

Half dry and half wet
 Another boo-boo I made was not checking the pre-stain conditioner and since the drawers were sitting on an angle and sort of leaning the pre-stain conditioner pooled at what would be the top of the drawer. I don't think this effected the stain any but it could have and that would have been disasterous. I just wiped away the excess and let it completely dry.

Close up of the door after pre-stain conditioner

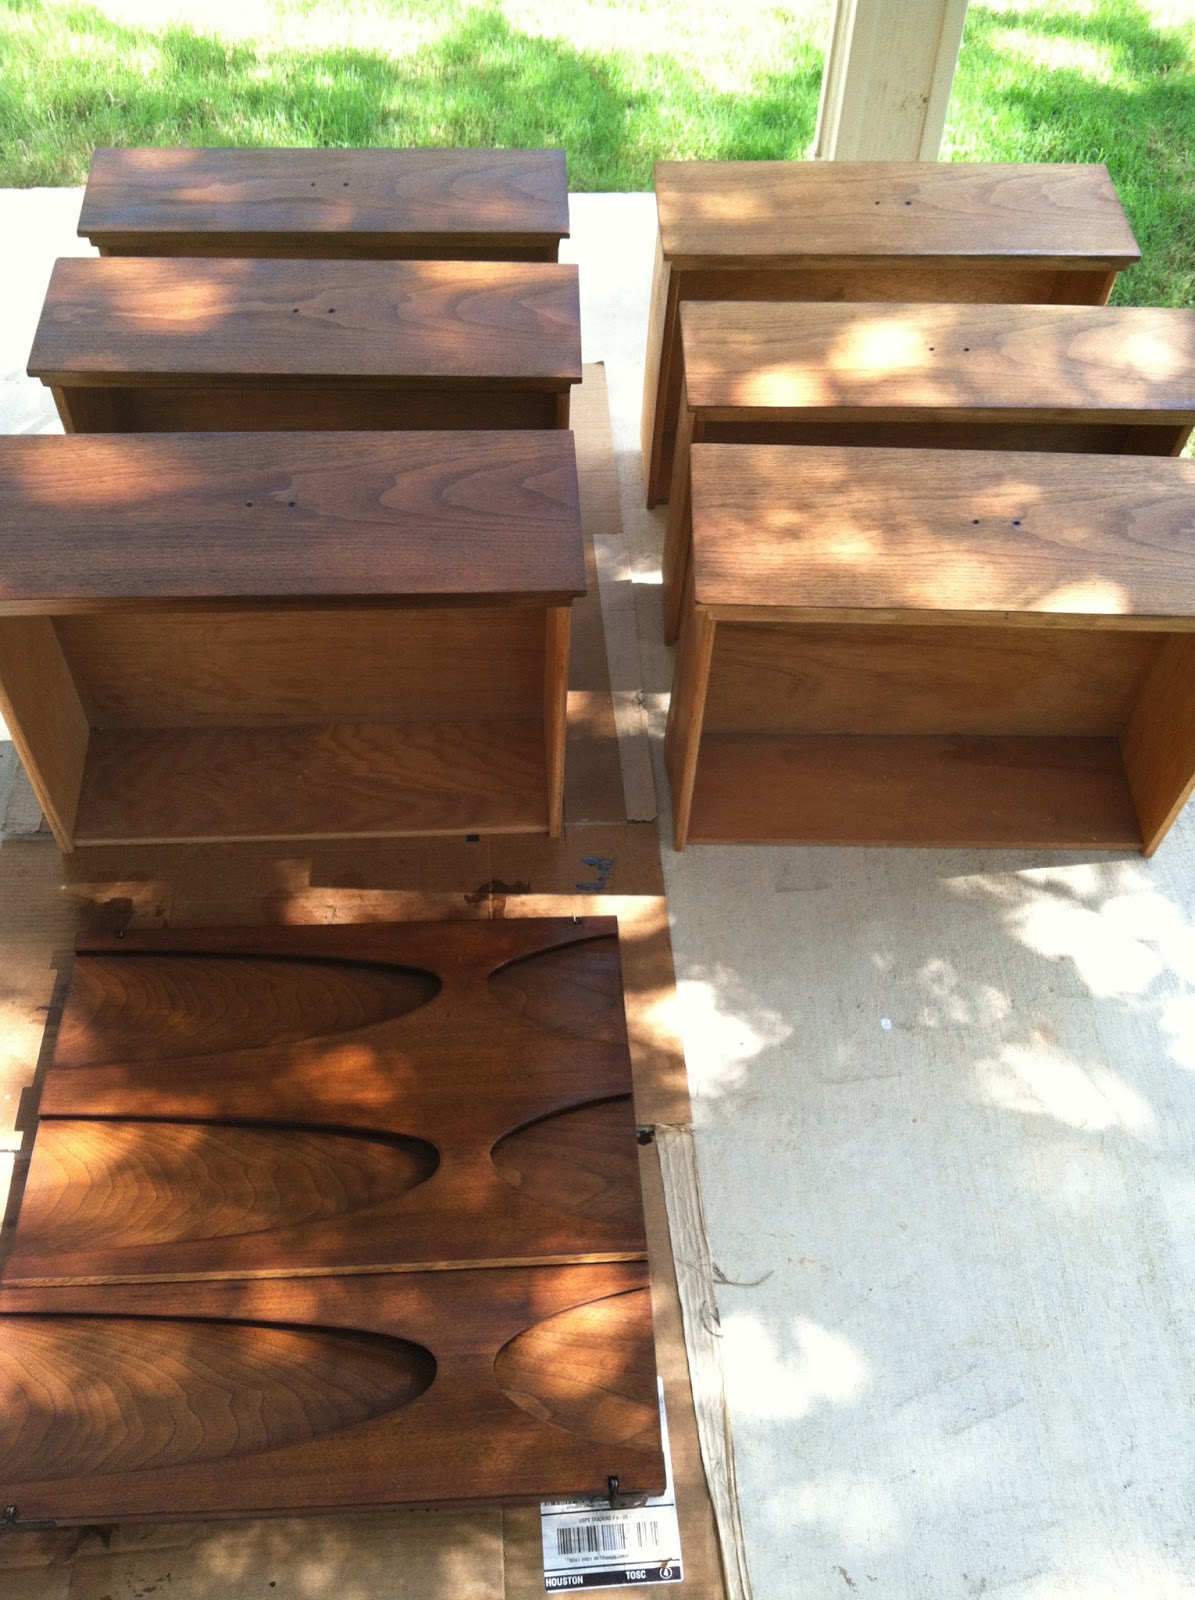
Two coats of stain on the left and the right is ready to go.

two coats of stain on the drawers

two coats of stain on the door.


This photo below is a comparison between the original wood stain center drawer and a newly stained drawer pictured on the top. The lighting is a little off because of the shadows and sunlight but in person the stain matches perfectly. I was surprised because I didn't have to mix stain colors. This is Cabot Dark Walnut stain right out of the can.
 
Comparison with original wood


Tuesday, July 9, 2013

Update on my Broyhill Brasilia Dresser refinishing

 The hardest part so far has definitely been this bottom rail. It feels like there isn't any veneer on this and it's just 100% walnut wood. The paint and stain took a really long time to sand off. You can see the damage to the veneer in between the drawers. I am still not sure what I am going to do. Either replace the 4 panels or just remove the damaged panels. You won't be able to tell unless the drawers are removed anyway. I am pretty sure the damage was caused by moving multiple times and by critters of some sort. 
 Here is the last two photos I took after completing the first sanding with 80 grit sand paper. I was super shocked at how beautiful the veneer was after all of these years. I was anticipating water marks and deep scratches which had been covered by paint. There were some scratches but they were easily sanded out. There was one tiny spot on the right hand side you can see in the photo below that is deeply "stained" by something. I don't mind though. It will give it a little character.

If you notice, I left the middle part of the dresser unsanded. The dresser had been painted at one time with a dark brown paint, however the middle drawers behind the doors were left unpainted. I considered sanding them down so that they would completely match the new stain, but I decided to keep that part the way it was from the factory. This is furniture I am never planning on getting rid of or selling so it was a personal choice. 

Since I took these photos I have completed the second sanding with 220 grit sand paper. The second sanding usually takes a fraction of the time compared to the first sanding. Next I will use pre-stain conditioner and then two coats of stain on the drawers and doors. I am a little concerned with putting the polyurethane coats on the top and sides. The top is very very long and using a brush will leave brush strokes and bubbles so I may use the rub-on method which worked well on the top of the end table. 

I wish there was someone I could learn this from. It would be great if there was a class on refinishing furniture. Everything I have learned has been from Russel or the "inner-nets" which is great but hands-on learning works better.

More pics to come. Stay tuned!

Tuesday, July 2, 2013

Beauty from a box

Good news! I finished the end table and I am happy with the way it turned out. I can't wait to see the dresser all finished. 

Before
After


Yesterday I had a pretty emotionally stressful day because I had to help my dad take his dog to be put to sleep. Then we had to dig a hole to bury her in. I am sore from using a pick axe to break up the soil. I was ready to just curl up in bed and sleep so when Russel brought a cute little box in from the mailbox I was happy to see my beautiful drawer pulls inside. They were shiny and beautiful. So, either the guy had them refinished or he actually had them fabricated. Either way I am happy with them. I can't wait to see how they look on the dresser. 


 I also convinced Russel to help me pick up my cedar chest. Mom's cedar chest. I was very happy to have it back. I cleaned it up and it looks fabulous in the living room. 


I am also almost done with the hardest parts of the dresser. I have the very bottom foot pieces and the sides and top. Then on to the second sanding which shouldn't take as long. The edges all had to be hand sanded because they are concave and not flat. The doors turned out nicely and only took about 6 hours all together.


 I am usually looking forward to working on this every day after work. Can't wait until 3:00!!!!

Tuesday, June 18, 2013

Learning new skills

I am actually having a great time refinishing this furniture. I didn't think I would enjoy it this much. 

I was doing my searching through Craigslist one night and I found what was described as a mahogany headboard. I clicked on it and I immediately saw the Broyhill Brasilia sliders. It was a king sized bookshelf headboard. We used to have these headboards when I was growing up. I was completely shocked when I saw the price and the listing was a few weeks old. I sent a text to the owner hoping and it was still available. After a few texts back and forth, Russel and I were picking it up. I got 3 of these sliders for $20.00!!!! 

 After a little clean up they turned out like this:

 So, my plan is to hang them on the wall in the bedroom. 

After we looked at the headboard itself, it was more work than I was willing to put in and the veneer needed to be replaced in many places. So, we decided to go ahead and say goodbye to the headboard. I put it back on Craigslist for free because I really didn't expect anyone to take it. I had multiple e-mails and someone actually picked it up before I could remove the posting. So, I hope that the new owners can refurbish it and make it like new. I'd love to see it all fixed up. 

That same day we transported the dresser from my Aunt's house and made a place for it in the garage. I have already started sanding the drawers. 

I have been extra careful to not sand through the veneer by accident. :-) 

The small night stand has been a little difficult to finish completely. I can't seem to get the top of the stand as perfect as I want. It's either a stray bubble, the poly was thinned too much (my fault), or a stray cat hair or bug in the finish. I will sand it down again and try one more time. Gotta keep my fingers crossed. 

Here are some pics of the Poly process though. 


 I have also contacted Broyhill Furniture to see when they are releasing their new Mardella line of furniture which pays tribute to the old Brasilia line. I have seen articles online and some say June/July but I haven't found anything from authorized dealers. 
I was doing the Snoopy dance when I received a response from them....

It's a little hard to read but it says that the line is in production now and we should see it in stores end of summer beginning of fall!!!!! YAY! 

This is the furniture I would love to have in the bedroom. 

The only thing I have not been able to locate for less than an arm and leg and my first born child are the drawer pulls. 

If you see these laying around anywhere call me, email me, smoke signal me, come knock on the door!!!!


Wednesday, June 5, 2013

Second Sanding

The second sanding went considerably faster. I am very happy with the end result of this phase. I am super excited because I get to pick out the stain tonight and start on that. I am really hoping it comes out like it looks in my head. I want it to look like it just got off the truck. 

Friday, May 31, 2013

Forgotten Hidden Treasure

Yes, I know it's been half a century since I wrote anything. I am sure no one even reads this anymore but just for my happiness I wanted to write about my newly found forgotten hidden treasure. 

A few weeks ago I talked to Russel about painting one of my end tables I brought when I moved. I needed a project. One day when I was surfin the inner-nets I wanted to see if I could find a match for the end table for cheap. Of course I had no idea who the manufacturer was. I searched and searched and finally found something close. It was made by Kent Coffey. Then I discovered the name for the era I have been trying to re-create subconsciously all along. Mid Century Modern. Late 60's through mid 70's. I hit the jackpot. It was Broyhill Brasilia furniture and I almost cried when I found the first end table for over $500.00. Then I remembered I left my long dresser that matched at my aunt's house. I nearly cried again when I searched and found one for over $1600.00!!!! Why was I so sad? I had both pieces painted in my early 20's because the paint was coming off and I wanted something darker. Then I realized who cares!!!! I owned two of these beautiful pieces and they were mine mine mine. 

Actual Broyhill Brasilia Commode. 


Broyhill Brasilia Dresser. Mine is not in this condition yet.


I begged Russel to let me keep them as our bedroom furniture and of course he is so awesome he said of course we can keep them. We discussed having them professionally refinished but I am going to try first. I've never refinished a piece, I've never even stained a piece of furniture before and I've never even sanded a piece of furniture before. But, I have an expert in woodworking afterall. He build an arcade and doggie stairs for Bella all by hand. 

I remembered long long ago taking the drawer pulls off so it could be painted and I remember not putting them back on. Back to the inner-nets I go in search of replacement hardware. *GASP* Each pull costs no less than $75.00. I currently need more Kleenex because of my past treatment of my awesome furniture. 

I am trying to make ammends. Here was the first step. Sanding off the paint and stain it was covered in. I am only two days in so hopefully I will post more photos as it progresses. 


Top and side


Back

I have been searching for the hardware at antique stores, thrift stores, ebay and etsy. Maybe one day I will happen upon them again. Or I will win the lottery and be able to buy a set of 6. But I'm keeping my furniture!!!!